Monday, November 12, 2018

A Zombie Loving Coffee Addict ATC with Vera Lane Studio


As some of you know, I love Vera Lane Studio digital stamps - they are fun, quirky, odd and there are lots of zombie and coffee themed images to play with. This month, in the Vera Lane Studio Facebook Group, there is a Coffee ATC Challenge.  Coffee and zombies.  My two favorite words.  But a coffee loving zombie is so much more fun and that is what today's project is all about. Hence the coffee and zombie!

As much as I would have liked to have used real coffee stained paper for this project, I have yet to try that, so I started by printing a free coffee stained digital paper I had in my stash and then cutting it to an ATC size - 2.5" x 3.5".  I also distressed the edges with vintage photo distress ink (Holtz/Ranger).  

Using the Calacas Digi Stamp Bundle - I printed two of the zombie images, along with some of the coffee cups, and the phrase.  I then fussy cut the zombie, the flower from the 2nd zombie, and 5 of the cups.  (In the end, I don't use the 2nd flower, I use more cups and more of the word "coffee").


I then colored in the cups and the zombie using a variety of BIC Ultra Fine and Fine Markers -Fandango Pink, Lime Sorbet, Sunset Orange, Yellow Blaze, Hot Aqua, Rambunctious Red, and Margarita Green.  I also used Copic R00 Pinkish White on the face. 

I cut a slit in the top of each cup so that the next cup can fit inside a bit.  I adhered these down to the ATC and then I inserted the zombie, after cutting off his legs.  Ouch!


Next, I needed some words for the ATC.  I didn't print enough of the phrase so I printed a few more, cut them out and distressed the edges.  I did a test with the words but both myself and my friend Debra decided it was too blah...doesn't POP!  


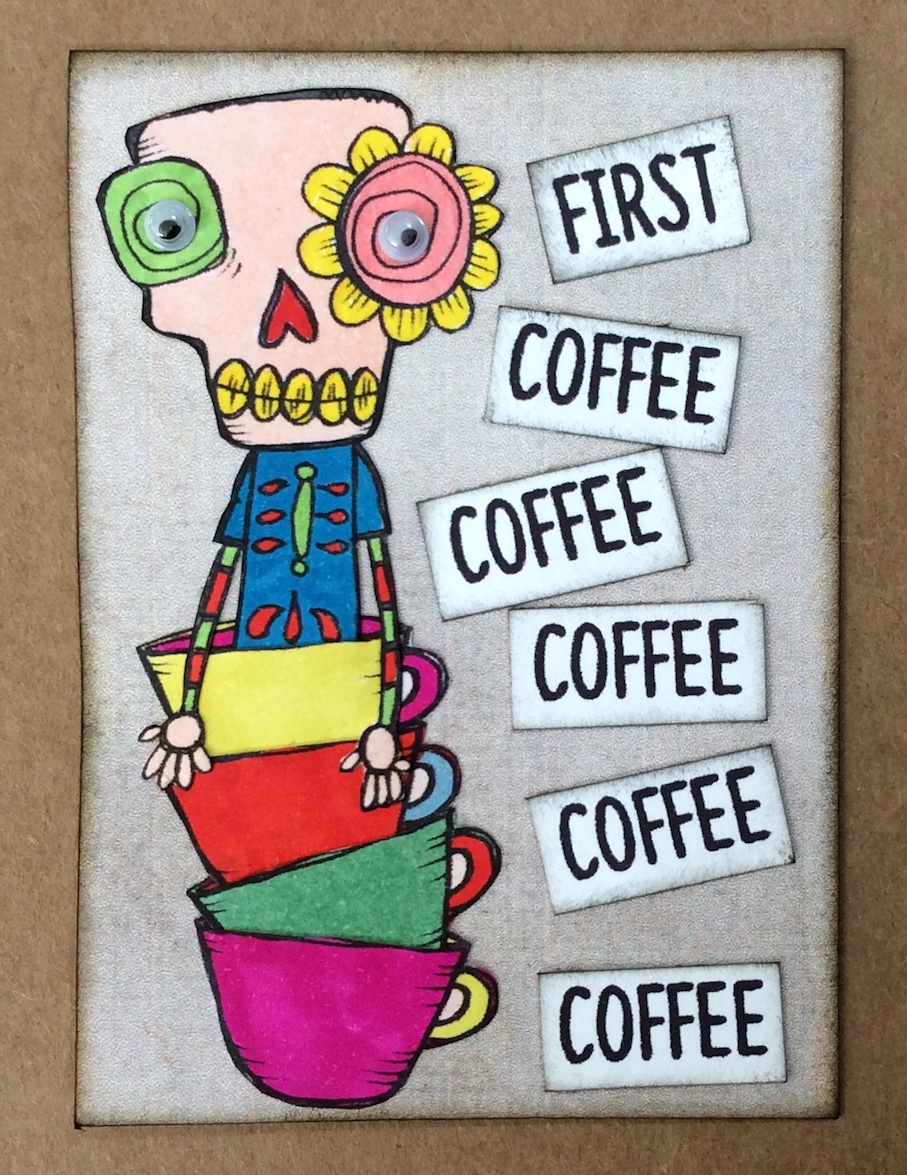
It needed more color.  So I took a piece of scrap cardstock and colored in some of the BIC Markers that I used so that I could layer the words on each color.  Much better.


I adhered the words to each of the colors, cut them out, and adhered them on the right side of the ATC. I ended up not having enough room for one of the colors.  As a last minute idea, I adhered some Yellow, Orange Peel, Firefly, and Glam Pink Stickles (Ranger) on each of the cups to give a slight shimmer.


Here is the final ATC....when I was adhering the ATC info on the back, the googly eyes fell off so I adhered even bigger eyes!  I think it looks even better now.


I'd love to know what you think of my coffee loving zombie ATC...please leave a comment below!  If you like my work and would like to follow my other social media platforms, here are my links - 


I hope you enjoyed today's quick ATC tutorial...as always, until next time - 

Hugs from Brasil - 

Michael

Friday, November 2, 2018

Day of the Dead / Dia de Los Muertos / Dia dos Mortos with Vera Lane Studio


Hello everyone and Happy Day of the Dead or Dia de Los Muertos (Spanish) or Dia dos Mortos (Portuguese) - depending on where you live or what language you speak.  I love this holiday and I love the idea of a special day to remember and celebrate those that have passed before us. 

Most people consider this a Mexican holiday but it is celebrated in many other parts of the world.  In the states it's called All Souls Day but parts of the USA in the Midwest and south also celebrate Day of the Dead because of the Mexican influence. 

Here in Brasil it's a 
public holiday, also called Finados, and is similar to other Day of the Dead celebrations.  Many people go to cemeteries and churches with flowers and candles and offer prayers. The celebration is intended to honor the dead. Memorializing the dead draws from indigenous, African and European Catholic origins.

There is a lot to learn about the Day of the Dead and, if you are interested, you can click on THIS LINK that will take you to a great Wikipedia page that explains it all in detail.  

I wanted to make something easy and colorful for this day and I made a card front to put up on the wall.  I started by printing two of these Sombrero Skulls (Vera Lane Studio on Etsy) on to white cardstock and coloring them with my Ultra Fine Tip BIC Markers (my fav).

  
I cut a piece of black cardstock, 4 7/8" x 6 7/8", and embossed it with the Shady Allure Embossing Folder (Spellbinders/E3D-019/Retired).  


Then I adhered a piece of black fun foam to the back and then adhered this to a piece of purple cardstock, 5" x 7".  I also fussy cut the two skulls and adhered them to the black cardstock with pop dots.


I didn't want to use a typical Day of the Dead quote, and I decided to use one of the Quote Chips from Tim Holtz - Live In The Moment - for the card front.  This way, every time someone looks at it, they get a  quiet reminder. LOL


And the final thing I did was to add some Stickles (Ranger) to various parts of the hat and face to add some shimmer.  


And here is the final piece after everything dried.  I think this is going to go on a shelf or the wall.  I love the black embossed background and I really love the bright skulls popping off of it. 

I'd love to know what you think!!  Leave me a comment below and, also, tell me if where you live celebrates this holiday and how you guys do it.  Until next time - 


Hugs from Brasil - 

Michael

Sunday, October 28, 2018

Cards & Coffee With Deb and Celeste - Halloween 2018


Hello everyone.  I am having "cyber" coffee and sharing cards with Deb and Celeste again today. Our theme for today is Halloween - one of the holidays I really miss from the states.  It's not a typical holiday here and, although there might be some parties and the kids will dress up for school, there is no trick-or-treating and there is no candy corn!!  I know...sad.  

For today's hop I am enjoying a cuppa Cinnamon Blueberry Crumble (YUM) in a new cactus mug that Ruy got a few days ago and which gave me an idea for a card but that will be next week and, I digress.

    
For my card today, I decided to use a digi stamp I have from Bugaboo Stamps called Trick or Treat Feet and I printed 4 of the images at 90% onto white cardstock.  


I trimmed one of the images and colored it using a variety of BIC Ultra Fine Tip Markers (my favorite markers).  I also layered it on to a piece of orange textured cardstock - 2.5" x 5.5" - and distressed the edges with Black Soot Distress Ink.


I then made an A2 card base of white cardstock to which I adhered a piece of decorative Halloween paper (Martha Stewart) to which I distressed the edges with the Black Soot Distress Ink.    


Lastly, I adhered the image to the card front with Tacky Glue (Aleene's) and then I applied some Firefly, Orange Peel, Glam Pink, Lavender, and Frosted Lace Stickles (Ranger) to certain areas of the image to give it some glimmer.  


And here is the final card after everything dried.  


I hope you enjoyed this card.  I think I will also enter this card into the If You Give A Crafter A Cookie Challenge No. 105.  Please go and show both Deb and Celeste some love by checking out their blog posts too!!  Just click on their names to be taken right to their blogs. 

Thanks for stopping by the blog today and, until next time - 


Hugs from Brasil - 

Michael

Friday, October 26, 2018

If You Give A Crafter A Cookie Challenge - No. 105 - Halloween Card With Vera Lane Studio


Hello everyone and Happy Friday!!  I wanted to make a quick post to show you guys another Halloween card that I made for the If You Give A Crafter A Cookie Challenge Blog - Challenge No. 105.  This is the 2nd card I made for this challenge because I love (and miss) Halloween.  The first card was yesterday and you can check that card out {HERE}.  

For today's card I used two digital items.  The first was a digital image from Vera Lane Studio on Etsy.  I love her images...quirky and fun.  The image I used is called October and it comes with the girl holding the pumpkin and two phrases. 

I started by printing out the image two times, coloring them with BIC Markers....one of them fully colored and just the pumpkin on the other.  I fussy cut her out and then I fussy cut just the pumpkin.  I then went back and added some Firefly Stickles (Ranger) to her eyebrows and some Orange Peel Stickles (Ranger) to her dress and her socks. 

While that was drying....

I printed out two of the designs in the Frightful paper pack by Design by Dani (SnapClickSupply).  One was a sheet filled with jack-o-lantern faces and the other had a graphic design with a small spider coming down from the upper left corner.  I made a top folding A2 card base of white cardstock and adhered the jack-o-lantern piece to the card front. 

Using a stitched rectangle die, I die cut the paper with the spider so that the spider was in the upper corner.  I then used the next sized die up and cut a piece of black cardstock.  I adhered the spider piece to the black cardstock and then this to the card front. 

Lastly, I adhered the October girl to the card front under the spider, then I adhered the pumpkin with pop dots.  I went back to the Frightful paper pack and printed out a sheet with lots of Halloween words, cut one of them out, layered it on black cardstock, and adhered this to the card front. 

Done!! 

After reading the above it does seem like a lot to do but it's really not.  Sorry for no photos with the steps but I forgot to take them.  Me bad!!! 

Anyway, I hope you like the card.  You have until October 31st to enter a card in the challenge if you choose to.  As always, until next time -

Hugs from Brasil -

Michael

Wednesday, October 24, 2018

If You Give A Crafter A Cookie Challenge - No. 105 - Halloween With All Dressed Up


Hello everyone.  I wanted to share with you guys a card I made for the current challenge over on the If You Give A Crafter A Cookie Challenge Blog.  This is Challenge No. 105 and the inspiration photo for the challenge is - 


I wanted to make a Halloween card but not a typical card with typical colors or images.  I found this great image called "Have A Magical Evening" from a store on Etsy called All Dressed Up.

I started by printing the image at 60% on white cardstock, I cut it using the 2nd largest die from A2 Matting Basics A (S5-131/Spellbinders).  Then I colored it using Ultra Fine Tipped BIC Markers.


I made an A2 card base of white cardstock and adhered a piece of black cardstock to the front.  Using the largest die from A2 Matting Basics B (S5-132/Spellbinders), I cut a piece of apricot colored cardstock.  


I adhered the apricot cardstock to the card front and then the piece with the image to the apricot.


I showed this to my friend Debra and she gave me a great idea.  Paper piece the moon and her socks.  So I went through my stash, cut some small pieces and then and printed the digi again so that it printed on the pieces.  


And adhered them on the card front.  I like it better now!!!  Thanks Debra!! 


And here is the final card fully finished.  The inside says "Happy Halloween".


I hope you enjoyed this quick card. If you want to enter a card in the challenge, you have until October 31st to do so.  I hope you will!!  

Until next time - 

Hugs from Brasil,

Michael

Saturday, September 29, 2018

Today is....National Coffee Day.....with Graciellie Design and Unity Stamp


Hello everyone!!  Yes, it's true.  Today is National Coffee Day.  Not that I need any special day to celebrate coffee since I drink it daily...several times a day, in fact.  But, since today is an extra special coffee day, I made a card....coffee themed. And I am drinking some of the best coffee in Brasil by Melita!  YUM! 

I started with a digi stamp called Stay Strong that I recently purchased from Gracielle Designs on Etsy.  If you do not like digi stamps, you can also buy this set as a rubber stamp {HERE} at Unity Stamps. 

I printed a full A4 sheet (cuz I will use these).  Then I had my Scan N Cut cut some of the cups out.

  
Next, I printed out one of the sentiments and die cut it with my stitched rectangle die.    I also stamped the flower image from Blossomy Condolences (Unity Stamp) and had my Scan N Cut cut it out.


I colored in the cup and the flowers with a variety of BIC Markers.


Next, I made a top folding A2 card with white cardstock and adhered a piece of designer paper to the front.  Then I adhered the piece with the sentiment to my card front and the cup next to the sentiment.


Next, I put some foam tape behind the flowers and adhered this so they were coming out of the cup.


For the final part, I applied some Stickles on some of the flowers and the heart in the center of the cup and called it a day!


Done!!  I love mixing and matching up different stamps or sets and this cup acts as the perfect vase for the flowers.  Perfect for a coffee lover like me!!  LOL  I hope you enjoyed this quick post.  Feel free to leave a comment below and, as always - 

Hugs from Brasil - 

Michael 

Tuesday, September 25, 2018

Travel Mini Album With Jen Of Eve Designs and Paper Phenomenon


Hi everyone!  I am always posting my cards, which I love to do, but I also love to make mini albums. I've always loved taking photos.  And I miss going to a Kodak store to pick up my package of photos that I took with my roll of film.  Remember an actual roll of film??  LOL 

Nowadays we keep all of our memories on a cell phone, Instagram, or Facebook and people have forgotten what it's like to sit down and turn the pages of an album and look at an actual photo. 

Hence the reason I love to make mini albums. 

For this album, I used the Paper Dream printable template from Jen Of Eve Designs along with a digital paper pad from Paper Phenomenon called Flight 2715.

Here is the cover of the book - 


And here are some of the pages inside the book - 


I made a video of the book, which you can watch {HERE} over on my YouTube Channel.  I hope you enjoy it.  I'd love to know so please leave me a comment below (or on my channel). 

I'm working on some ideas for video tutorials for books and cards too.  Thanks for stopping by my blog today and, as always - 


Hugs from Brasil - 

Michael

Monday, September 17, 2018

"Seasonings Greetings" Shaker Card With Unity Stamp


Hello everyone.  Today's card has been in my head for weeks and I finally found the time to make it. I did some fine tuning as I made the card and it actually came out better in the end than it was in my head.  Has this ever happened to you? And I have to thank my friend Debra for the sentiment idea.  I was going to use "Seasons Greetings" but then she suggested "Seasonings Greetings", which I love even more, and that's what I went with in the end!   So, thanks Deb!! 

Here's how I made this card - 

1.  I prepared the sentiment "SEASONINGS GREETINGS" on the computer and printed two of them out on A4 white cardstock. 


2.  I positioned the stitched rectangle die over the sentiment, adhered it with some washi tape, trimmed the cardstock, and die cut it with my Big Shot.  (I'm sure there is an easier way with software but I do not know how to do this.  So, if you do, please let me know in the comments and I will love you forever!!  LOL)


3.  I placed one of the card fronts in my Misti Stamping Tool and stamped the salt and pepper shakers from What's Shakin' (Unity Stamps) with Memento Tuxedo Black ink. 


4.  I placed the card front in my Scan N Cut and had the machine cut the two images out with a .8 border.


5.  This next part is important to make THIS shaker card. I wanted the images of the salt and pepper shakers to be perfectly placed under the acetate.  So, before I adhered the acetate, I cut another piece of white cardstock to the same size - 4" x 5.25", placed it on the Misti Stamping Tool again and stamped the images.  Then I trimmed 1/8" off each side.  (This will all make sense soon.)

6.  I made a top folding A2 card base of white cardstock and adhered a piece of Christmas decorative paper to the front.

I also adhered a piece of acetate to the back of the stitched rectangle piece with the images cut out of it.  Then I adhered foam tape to the back.  

You should have at this point - your card base with the decorative paper, the piece of white cardstock with the images stamped on the front, and the stitched rectangle piece with the acetate and the foam tape on the back.


7.  Next, I colored the images with a silver gelly roll pen and a red and green Ultra Fine Tip Sharpie markers and glued it to the center of my card front.  This is why I trimmed 1/8" off each side - so it would fit nicely under the final piece.


8.  Next, I put a small amount of salt over one image and some pepper over the other, removed the tape backing from the foam tape, and adhered this over the images.


Here is the final card.  I love how, when the card is standing up, it looks like the shakers are made of glass and have some salt and pepper in the bottom.


I hope you enjoyed this card and the idea.  Please let me know by leaving a comment below.  I'll be back soon with another project.  Thanks for stopping by the blog today and, until next time - 

Hugs from Brasil - 

Michael  

Make A Tall Giraffe Slimline Card Using An A2 Giraffe Stamp | Technique Junkies | Giraffe Love

  Hello all. I am in love with the new Giraffe Love stamp from Technique Junkies .  It's one of the new stamps in the April 2024 New St...